CONTENTS
1. System requirements
2. Preparing Harddisk Partitions
	2.1 Tools for Windows/DOS
	2.2 Tools for Linux
	2.3 Vector Linux Included Tools
3. Obtaining Installation Media
	3.1 Tools for Windows
	3.2 Tools for Linux
4. Starting the Installation
	4.1 Supported controllers
	4.2 Direct ISO Install on a Windows Host
	4.3 Direct ISO Install on a Linux Host
	4.4 Bootable CDROM Install
	4.5 Floppy and CDROM Install
5. Installation process step by step
6. Post-install configuration
	6.1 Set up Lilo
	6.2 Configure the System
7. Using the system for the first time
	7.1 Login to VectorLinux
	7.2 System administration
	7.3 Create passwords and users
	7.4 Reboot and Shutdown
 8. Enjoy the fruits of your labor
 9. Troubleshooting
10. Credits
Getting
Started
Welcome to Vector Linux. A distro with two
mottos:
- When choices matter: this distro has a
clear purpose, thus, contains the best, well integrated software for
that task.
- At the speed of light: only the unbloated
software makes you feel sharp, and more productive.
To achieve that, Vector Linux releases several
flavours called the Standard, SOHO, and Deluxe editions. Each flavour has
a set of software, thus different flavours have their own hardware requirements
to run smoothly. So make sure you have read the requirements for the flavour
you are about to install before proceeding. The good news is, except for
the software set and the requirements, the installation procedure for all
flavours is basically the same.
Top
1.
System Requirements
The
accurate requirements can be found in the introductory documentation published
with each flavoure. The following table list the reasonable requirements.
| Item |
Standard |
SOHO |
Deluxe |
Dynamite |
| Processor |
Pentium |
Pentium III |
Pentium III |
Pentium |
| Memory |
64 MB |
196 MB |
196 MB |
64 MB |
| Hardisk (root) |
1000-1500 MB |
2000-3000 MB |
2000-3000 MB |
800-1000 MB |
| Hardisk (swap) |
128 MB |
512 MB |
512 MB |
128 MB |
| Hardisk (home) |
as needed |
as needed |
as needed |
as needed |
| Video |
800x600 pixels, 16 bits color |
1024x768 pixels, 24 bits color |
1024x768 pixels, 24 bits color |
800x600 pixels, 16 bits color |
Of course, you also need
compatible keyboard, mouse, and CDROM. Other hardware components optional,
such as network card, modem, sound card, cdwriter, DVD, printer, etc.
Linux also supports modern USB devices including pen drives, digital cameras,
and scanners.
Top
2. Preparing Harddisk Partitions
As you can see
in the requirements, Vector Linux recomends three harddisk partitions
with various size.
- Root
partition: this is the main partition to install the Linux and
all software programs.
- Swap
partition: add this if you want virtual memory. It expand the
capacity of actual memory (RAM), so you can run more programs
at the same time.
- Home
partition: for keeping your data.
You may prepare these partitions prior
the installation by using any partitioning programs (will be described
later). It would be an easy process, but the difficult part is planning
the partition layout of your harddisk, especially if you want to
install this Linux alongside other operating systems (Windows, other
Linuxes, etc).
When you buy
a new computer, usually it has preinstalled Windows OS that occupies
the entire harddisk (drive C:\). However, you may find out that
most of the harddisk is unused (free) and going to be wasted.
Fortunatelly, a big harddisk (say 40 GB) can be divided into smaller
partitions (ten partitions of 4 GB each, for example). Each partition
can be used for different purpose, thus you may install many operating
systems on one harddisk, and boot one of them for an occasion
(multibooting).
If you make more
partitions, Windows OS automatically presents them as drive C:,
D:. E:, etc. Linux uses different convention. Firstly, a computer
may have many harddisks. Linux maps each of them as a device.
For example:
- /dev/hda
: First Master IDE drive.
- /dev/hdb
: First Slave IDE drive.
- /dev/hdc
: Second Master IDE drive.
- /dev/hdd
: Second Slave IDE drive.
- /dev/sda
: First SCSI device.
- /dev/sdb
: Second SCSI device.
If you have only one IDE harddisk, it
is almost certainly the /dev/hda. The second harddisk could be /dev/hdb
or /dev/hdc, depends on where it is installed.
Next, each harddisk
can be divided into four PRIMARY partitions. For the first harddisk
(/dev/hda), they are mapped as /dev/hda1 .. /dev/hda4 respectivelly.
But hey, wait, we want more than four partitions!
Unfortunatelly, four is a legacy limit you can do nothing about.
The work around is, one of the primary partition (/dev/hda2 ..
/dev/hda4) can be used as an EXTENDED partition. Inside the extended
partition, you may create more LOGICAL partitions. The logical
partitions are named /dev/hda5, /dev/hda6 and so on.
With that (hard
on my logic) theory, let's get back to business. We need three
partititions to install Vector Linux. So, if you use this harddisk
entirelly for Vector Linux, a possible partitions layout is:
- /dev/hda1
(primary): swap (128 MB)
- /dev/hda2
(primary): root (1000 - 3000 MB)
- /dev/hda3
(primary): home (500 MB and more)
If you want to
install VL alongside Windows-OS, things became complicated because
now we need more than four partitions. Here is the recomended
partition layout:
-
/dev/hda1
(primary): Windows C:
Windows (9x/NT/2000/XP,...) should be installed on the first
primary partition.
-
/dev/hda2
(primary): Extended
This partition is used to hold the logical partitions.
-
/dev/hda5
(logical) : Windows D:
Use drive D: to store files you would like to share between
Windows and Linux. You should format this partition as
FAT32. Do not use NTFS.
-
/dev/hda6
(logical): swap
then put Linux swap partition next.
-
/dev/hda7
(logical): / (root)
Install VL here
-
/dev/hda7
(logical): /home
This is for storing your data.
All right, that's the plan. Now we can
start to actually create the partitions. In this case, we need two
harddisk utilities for resizing and partitioning. Assume that the
initial harddisk has one drive C: with Windows on it, and we want
to multiboot it with Linux. The general steps are as follow:
- It
is always recommended that before any re-partitioning, you run
a scandisk and defragmentation on the drive. Of course, you
should also make a backup of your important files.
- Use
the resizing utility to shrink the drive C: (/dev/hda1), so
you will have enough free space.
- Use
Windows compatible partitioning program to create /dev/hda2
and /dev/hda5.
- Use
any partitioning program to create /dev/hda6 through /dev/hda7.
You have several choices to accomplish that.
2.1
Tools for
Windows/DOS
Partition Magic is
a popular commercial product for non-destructively resizing, partitioning
and formatting the partitions. The GUI interface makes it easy
to use. Very recomended.
The free alternative is using Fips (resizing) and fdisk (partitioning).
Fips is a free DOS program for non-destructive splitting of harddisk
partitions. Using fips is beyond the scope of this document. However,
the fips package comes with it's own extensive documentation (http://www.igd.fhg.de/~aschaefe/fips/),
so please take the time to read it before attempting
to resize or partition your drive with this method. Fips is provided
on VL install CDROM. Meanwhile, fdisk is a standard tool on any
DOS/Windows.
2.2
Tools for
Linux
We
recomend to use SystemRescueCd (http://www.sysresccd.org/).
This is a live Linux system on a bootable cdrom that aims to provide
an easy way to carry out admin tasks on your computer, such as
creating and editing the partitions of the hard disk. For our
purpose, it includes these needed programs:
2.3
Vector Linux
Included Tools
The
VL installation CDROM includes a resizing utility (GNU Parted)
and partitioning utilities (fdisk and cfdisk). The install program
provides friendly menu for them. So don't worry. If you have not
prepared the partitions ahead of time using one of the tools mentioned
above, you may use the provided tools during the install.
Top
3.
Obtaining Installation Media
Each flavour
of Vector Linux is distributed as an ISO file. The obtain it for
installation, the steps are:
- Download
the the ISO image file (.iso) and the corresponding md5 checksum
file (.md5).
- You
should check the image file before burning it to a CD, to make
sure it has not been corrupted during download. For that, you
need to do an "md5sum check", that means comparing
the "fingerprint" of your image file (.iso) against
the fingerprint stored in the checksum file (.md5).
- Burn
the image into a bootable CDROM using a cdwriter. Note that
VL allows you to install the ISO file directly (see Install
Methods after this), so this is an optional step.
If you don't have a good internet connection,
or a cdwriter, you may order a well prepared CDROM from our store
(http://www.vectorlinux.com).
3.1
Tools for Windows
You may download the ISO image and
MD5 checksum using any web browser, FTP client, or download manager.
However, some web browsers (Internet Explorer, for instance)
have a tendency to rename
.md5 files as .htm or .txt. You can just rename it back to .md5.
For integrity checking, download and unzip the GUI tool md5summer
(http://www.md5summer.org/). Make sure you are using version 1.2.0.5
or above. The first time you run it, it asks permission to associate
the extension .md5 with itself. If you agree, you just need to
double-click on a .md5 file to check the integrity of the original
file (as long as they are both in the same folder). Otherwise,
you have to manually browse to the .md5 file within the md5summer
interface, then click on the "Verify
sums"
button and select the .md5 file. If you get an OK for the VL .iso
image file, you can proceed to burn it as a cdrom image.
There
is another tool you could use (this one is command line driven):
-
Download the following file:
http://theopencd.sunsite.dk/md5sum.exe
or get it from here:
http://www.etree.org/md5com.html
-
Put it into your system folder (c:\windows\command
for Win95/98/ME or c:\winnt\system32 for NT/2K/XP). Alternatively,
you can just put it in the same folder as the .iso and .md5
files. If you do that, though, it will not be available system-wide.
-
Open a DOS box by clicking the "Start"
button, then "Run",
there type "command"
if you are using Windows 9x/ME or "cmd"
if you are using Windows NT/2K/XP, and click "OK".
You are now at what is called a "prompt". It's
good to get used to it.
-
Go to the folder where the .iso and
the .md5 files are located, for example:
cd \download
-
Type the following command and then
press enter:
md5sum -c vl-5.0.iso.md5
If the image is allright, you should get a "file is OK"
message.
After that, you may want to burn the ISO
image into a CDROM. For this, use the program that is provide
by your cdwriter (e.g: Adaptech CD Writer, or Nero Burner).
3.2
Tools for Linux
Most Linux systems already have the tools.
Here is how to do that on Linux console/terminal in three steps:
-
Downloading the ISO image and MD5
nohup wget ftp://anymirror/path-to/veclinux-5.0/iso/vl-5.0.iso
nohup wget ftp://anymirror/path-to/veclinux-5.0/iso/vl-5.0.iso.md5
-
Checking the integrity
md5sum -c vl-5.0.iso.md5
-
Burning the ISO into a CDROM
cdrecord -v fs=6m speed=4 dev=2,0 vl-5.0.iso.md5
Of course you can always use the GUI
alternative like d4x, k3b, or xcdroast.
Top
4.
Starting the Installation
To start the installation, there
are two concerns. The first is about your harddisk controller.
Today, there are three common controllers called IDE, SCSI and
SATA. You must boot the installation using the kernel that support
that controller. The second concern is which install method to
use. Depends on the capability of the target computer, Vector
Linux can be installed via one of these method:
- Direct ISO File from a Windows host.
- Direct ISO File from a Linux host.
- Bootable CDROM.
- Floppy disk and CDROM.
4.1
Supported
controllers
VectorLinux supports and can be installed
on systems using IDE/ATA hard disc controllers, which at the moment
of this writing is the most popular ones in standard desktop systems.
Other wellknown standard is SCSI controllers, but due to its high
pricing, only common on high-end server systems. Meanwhile, the
emerging standard is SATA (Serial ATA) controllers, which are
being quickly incorporated by motherboards manufacturers.
If
you are having difficulties using your SATA disks, make sure you
have set the BIOS correctly. In a nutshell, set the BIOS to "Enhanced
mode SATA only". This is counterintuitive, but it means
use enhanced mode only on the SATA, not just use the SATA
and turn off the PATA. If you set it to enhanced mode SATA+PATA,
the kernel will lock as it tries to use an IDE driver for the
SATA controller. Symptoms are the kernel hanging after detecting
hda - hdd.
Please
know the type of your harddisk controller, because it determines
the kernel needed for installation. The default kernel supports
IDE controller. Otherwise, you need to specify scsi or sata kernel
during the install.
4.2
Direct ISO
on a Windows Host
This
is a new method that will save you a CDROM burning. Assume that
you already have Windows running on the computer, and the partitions
have been prepared as suggested before. Download the following
files from Vector Linux FTP site (e.g: ftp://anymirror/pub/vectorlinux/veclinux-5.0)
-
The ISO file from one of iso directory (iso/, iso-soho/, or
iso-dynamite/). Put it on top level directory (C:\ or D:\).
Don't forget to check its integrity as explained before.
- The
next files should be placed into C:\loadlin
- loadlin.exe
Get it from “install/loadlin/” directory whithin
the FTP site.
- initrd.img
Find it as “isolinux/initrd.img” whithin the
FTP site
- The
kernel file that matches your system (ide, scsi,
sata, adaptec)
You may select one of them from “isolinux/kernel/”
directory whithin FTP site.
Then
proceed with the installation:
-
Shutdown Windows to DOS mode.
-
Type “cd C:\loadlin” <enter> (without quotes)
- Type
“loadlin ide root=/dev/ram rw initrd=initrd.img”
<enter> (without quotes).
You should replace the “ide” with the name of the
kernel that you downloaded earlier. The standard installation
process will be started.
4.3
Direct ISO on a Linux Host
If you have another Linux running on the
computer, this method will be easy. You need to download the following
files into a directory (e.g: /home/download):
- The
ISO image file (vl, vlsoho or vldynamite).
- vlinstall-iso
Find it as “install/vinstall/vinstall-iso” whithin
the FTP site
Now go to the text console (press Alt-F1)
and login as root. Proceed as follow:
- Switch
to run level 2 (or 3 in Slackware/Redhat, etc)
init 2 <enter>
- Go
to the directory where you downloaded the files, i.e.: /home/download
cd /home/download<enter>
- Now,
install using the ISO file
./vinstall-iso vl-5.0.iso <enter>
4.4
Bootable CDROM
Use this method if you already have
the VL install CDROM, and your computer is capable to boot it.
First, you may need to change the boot order. Changing the boot
order allows your system to boot from different devices like your
hard drive, floppy drive, CD-Rom, etc.
When you select an installation method, you might have to set
up your system to boot accordingly, to do this this, when your
computer starts up, go to the BIOS options setup screen (1).
There should be an option for boot order (general options are
C drive, A drive, CD, etc). Choose which should boot first, save
out of the screens and restart the computer. You can change the
boot order back when you are done installing VL.
Note:
(1)Not all systems use the Delete key to enter the BIOS. Some
systems use one of the F# keys. Some use a combination of keystrokes.
You should see which key during boot screen shortly after turning
on your machine. Otherwise, check the manual for your hardware.
After
the boot order is properly set, place the VL installation media
in the drive and reboot the system. The boot process will give
you a prompt. This is the chance for you to select the correct
kernel that support your controller. If you have no SCSI nor SATA
controller, simply press [enter] to use the default kernel (ide).
Otherwise, type the kernel you want, e.g:
boot:
scsi [enter]
That's it. The install procedure will
be started.
4.5
Floppy Install
This method allows
you to install Vector Linux using the VL CDROM (any flavour) and
two floppy disks. You may have to use this method if:
- The
target computer cannot boot from the CD. If this is not correct,
use the CDROM method instead.
- The
target computer is not running an operating system (Windows/Linux)
yet. If it is, you may use the Direct ISO method instead.
Assume that you already have the the
CDROM. You may use it to create the floppies on another Windows
or a Linux host. Preparation on a Window HOST is as follow:
On a Linux host, the preparation is
as follow:
- Launch
a terminal
- Insert
the CDROM and mount it.
mount /dev/cdrom /mnt/cdrom
- Insert
blank floppy #1, write the kernel image into it using this command:
cat /mnt/cdrom/install/floppy/bare.i > /dev/fd0
- Take
out floppy #1, Insert floopy #2, enter this command:
cat /mnt/cdrom/install/floppy/rootdisk.img > /dev/fd0
Bring the CDROM and the two floppies
to the target computer.
- Set
the computer to boot from floppy
- Insert
the CDROM
- Insert
the floppy #1
- Boot
the computer
- On
the boot: prompt, press [enter]
- After
asked, replace floppy #1 with floppy #2
- VL
install screen will appear
Top
5.
The Installation Process Step by Step
When
you launch the installation process, after some initial start up messages,
you'll be taken directly to the install screens.
Note that the images presented in this guide can refer to a VL version
that is not the one you are installing, but the differences should be
minimal, such as the name of the version and the amount of available applications.
- Start
up – On the first screen you have four options:
- Select
the keymap to be used during the installation. You should select
this menu for the first time if your keyboard in a non-US layout.
-
Start the installation. The main course.
- Repair
lilo (Linux Loader). This is a handy utility in case you have an
installed Vector Linux, but somehow you cannot boot it because of
corrupted LILO.
- Exit.
This will bring you to the Linux prompt. It might be required if
something is going wrong with the installation and you are a kind
of expert that able to fix it manually.

- Once
you start the installation, the routine will look for the installation
media in the following places:
- Any
harddisk partition that contains installation files (the same as
VL CDROM)
- Any
harddisk partition that contains the ISO file in the top directory
- CDROM
drive
If
a media is found, it ask you to confirm. Select Yes to proceed, No to
search another media.

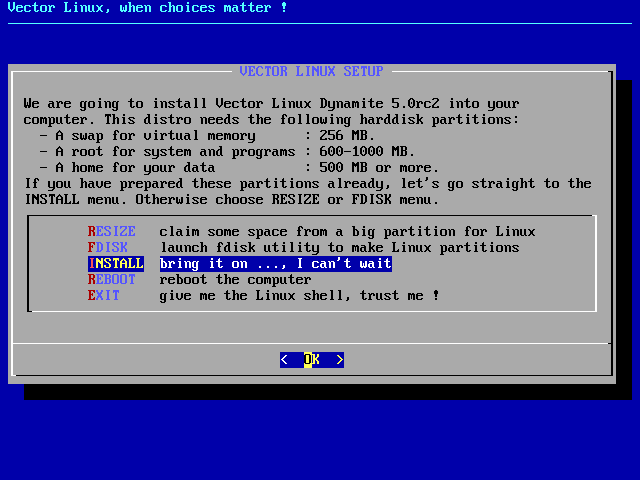
- The
next screen shows you the harddisk requirements of the soon to be installed
flavour. If you've already set up your partitions, let's start the installatio
directly. Otherwise you may modify the harddisk partition using the
builtin tools. RESIZE menu is a simple front end for GNUParted. Meanwhile
the FDISK menu will launch a menu driven partitioning program called
cfdisk. Warning, do not proceed to the INSTALL menu if you don't have
the required partitions.
- You
are now presented with a list of the next steps the routine will perform,
it goes through each of these steps in order.
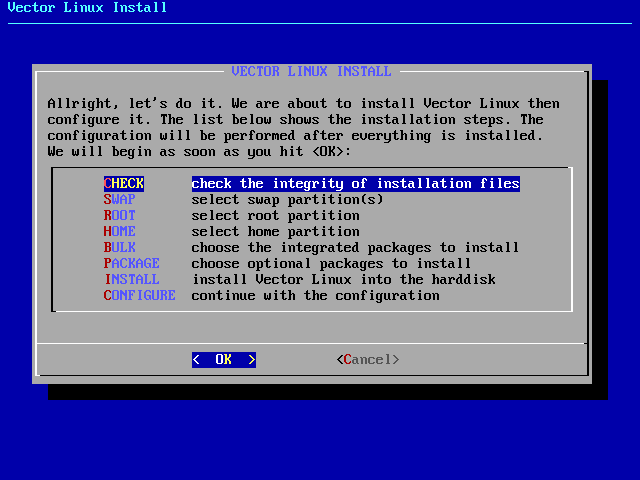
-
In the check-files screen, you may choose which files are to be verified
for any damage or corruption. If you are confident enough about them
you could skip the verification, but if the files are somehow damaged
the installation will probably fail later.
- Now
the routine will present you with any swap partition detected (it should
have been prepared previously either in step 3 or before, using third
party tools). Choose the one to use and select OK..
- The
next step is to choose your root partition. This is the one where you
want to install VectorLinux. You will have the chance to select a different
partition for your /home directory later.
- Then
select the filesystem you prefer for the root partition: reiserfs, ext3
or ext2.
ext2 is the older Linux filesystem, reiserfs and ext3 are both newer
and more robust journaling filesystems.
- Next,
you can choose to use a different partition for your /home directory
or use the same one that is used as root. The "/home" is where
files that belong to users are to be stored, and "root" is
where the Operative System´s files will be stored.
- The
next dialog allows you to choose what bulk files to install. The bulk
files are a compressed file of preinstalled, well-integrated packages.
Among them, the veclinux.bz2 is the one that contains the basic support
that will be required by other more specific applications. By installing
these bulk files you lay the ground to add future applications with
minimal fuzz.

- After
that, you can choose individual applications to be installed according
to your needs. Once you selected your applications, hit Enter to proceed.

- You
are now ready to install VectorLinux to you system. You can review the
choices you have made and go back and do some modifications, or you
can select OK to continue installing VectorLinux.
Once you hit OK, and the installation proceeds, it will format the partitions
you selected for root and /home, and any information in them will be
erased, so please verify everything before continuing.

The
installation will take a little while, so you may sit down and relax or
go and get some drink. The time the installation takes will vary depending
on your system´s speed. After a while, the screen could go blank to
enter in power saving mode. In that case, press [SHIFT]
on the keyboard to get it back up. If you hit [enter] or [space] you could
be inadvertently accepting a choice the routine might have reached.
After
the installation is done, you will be required to do some basic configuration,
as explained in Section 6.
Top
6.
Post-Install Configuration
Once
VL has been installed, a configuration screen is presented. This allows
you to configure sound and video, set up your network connection if you
have one, etc. This screen can also be accessed later using "Vasm"
as root.
However,
it is recommended that you DO NOT skip this configuration
step at installation time.
6.1
Set Up LILO
You
will be prompted to set-up “LILO”, the Linux Loader that boots
the system.
Choose
where to install lilo:
- the
root partition (if you installed VL to /dev/hda2, this would install lilo
to /dev/hda2)
- the MBR (master boot record) for the disk
- a floppy drive

If you
have another boot manager that can point to your Linux partition, then
you can install to the root partition where you installed VL. If you want
Lilo to take over the boot process
entirely, install to the MBR of the disk. If you're not sure and you don't
want to cause any problems, install to a floppy. Just make sure your computer's
BIOS is set to boot from the floppy drive first. This is probably the
safest (but slowest) method if you're worried about altering your existing
configuration.
Choose
to enable framebuffer or not. This option affects how the boot process
looks, and the onscreen indications will let you know what option is best
for you.
Add any
additional parameter you need to boot you system. If your system didn´t
require any special parameter to perform the installation, then leave
this field empty.
If you
have them, Lilo will detect the partitions and Operative Systems in you
hard disk and allow you to select which ones you want to be present in
you boot menu.
After
you've installed VL, you can change the lilo configuration by using "vasm"
as root, which will bring up the configuration screen again, or, also
as root, you can edit the
/etc/lilo.conf file by hand. After editing the file, be sure to issue
the following command as root: /sbin/lilo. This will commit the changes
to the lilo bootloader.
6.2
Configure the System
Once
Lilo is installed, the next steps are to configure this new system. On
some circumstate (e.g: when you are installing with ISO-File on a Linux
Host), it is not safe to perform the configuration. In this case, you
may reboot the system. The configuration will be continued later.

The first screen shows the configuration steps,
and allows you to choose which ones are to be performed. The wise decision
is to select them all, unless you have experienced some problem with the
suspicious step before. Thus you are walked through a series of screens
to configure the keyboard, auto setup the basic hardware, select network
settings, set the video, sound, and time zone. The configuration will
try to detect most of the settings. So this would be easy.
On the last step, the configuration ask you to change the root (superuser)
password and add the first ordinary user. Please don't skip this step
for your own security. On any Operative System, working daily as root
is not advisable, so you should set up a normal user and use that for
normal tasks and resort to root only for administering the system.
When this
is done, you simply press “OK” to restart the system and boot
into VectorLinux for the first time.

Top
7.
Using the system for the first time
7.1
Login to VectorLinux
When you
boot into VectorLinux, you will get six text consoles, and if you enabled
it, one GUI desktop. You may switch between them by pressing [Alt]-[F1]
through [Alt]-[F7] on the keyboard. You will be asked for a username and
password. If you did not change the root´s password during installation
you should use root as username and leave the password empty. Otherwise,
use the name and password of the account you created earlier.
If your system has not running a GUI system
yet, but you want it, you may login into a console as ordinary user, then
type:
user:$ startx
Alternatively, you can launch the GUI login mode
by switching runlevel into 4 or 5. Please login as root on the console,
then type:
root:# init 4
7.2 System Administration
If
you want to further configure your system, you can launch VASM (Vector
Administration and System Menu) as root:
root:# vasm

This will bring you a menu that enable you
to set many basic configuration from administering the user to setting
up the file system. The common menu are the ones you have been performed
during the installation. Some others are able to configure more advance
settings, you might be interested in:
- USER:
add more users, also delete some.
- X-WINDOW:
change various GUI settings, including to switch window manager and
GUI login manager.
- SERVICE:
set background services such as samba, printing, web server, and more.
- NETWORK:
you may add more network card, set modem and wireless, also enable simple
firewall and internet sharing.
- HARDWARE:
most of this have been performed during install. You may redo it again
if you add a new hardware.
- FILESYSTEM:
allows you to add more partitions.
By the way, you can run VASM on console (text
mode) as well as on the GUI. If you launch VASM as an ordinary users, it
presents only a limited menu, but allows you to switch into superuser mode.
7.3
Reboot and Shutdown
There
are many ways to reboot the system, including
-
From a console (not GUI) press Ctrl-Alt-Del
- From a console or GUI terminal, type "reboot"
- From a GUI windows manager, choose "reboot" menu.
Meanwhile,
to turn off the system, you may:
-
Type "halt" or "poweroff" from a console.
- Select "shutdown" menu from a windows manager if available.
Top
8.
Enjoy the fruits of your labor
Please
join our message forum as you can get great information and help there
to enhance your VectorLinux experience (http://www.vectorlinux.com/forum/).
Top
9.
Troubleshooting
Error type 1:
installation
gives you a message saying that it can't find the vector bz2 kernel and
/ or saying that /dev/xxxx is not a valid block device.
This
error usually appears when you have more than one optical drive (CD /
CD-RW / DVD) and you are trying to install Vector from the second unit.
Move the installation CD to the first drive.
Error
type 2:
Installation
halts or does not start properly after a seemingly correct installation
or you get messages about CRC errors during install
That
kind of issue often suggests file corruption during download or a faulty
burning process.
The
first thing to do, if you haven't already done so, is to check the .iso
file for corruption; please refer to section 3 of this manual. If the
.iso file passed the mdsum integrity check , then you could try burning
the file at a slower speed or use a different brand of media.
Remember
to burn as a cd image, not as a conventional file!
Error
type 3:
You
get one of these two messages:
Kernel
Panic: Aiee, killing interrupt handler!
In interrupt handler - not syncing.
or
Error!
There was a problem!
Code: 39 36 75 03 5b 5e c3 5b 89 f0 31 c9 ba 03 00 00 00 5e e9 cb
Installation not complete
Please press enter to activate this console
Those
errors are usually related to old hardware, and It could mean that you
need to pass some commands to the boot process.
Some
commands you may try are:
linux
mem=16M (replace 16 with the correct amount of memory in your PC)
linux ide=nodma (disable udma access, for old hard drives)
These
commands disable power management, Notebooks often require them:
linux
noacpi
linux noapm
linux pci=noacpi
linux acpi=off
linux apm=off
Error
type 4:
Your
SCSI or SATA hard drive is not available to install VL on it.
The
required driver for you SCSI card is not being loaded, and therefore your
disks are not seen by the install routine.
Error
type 5:
Installing
from CD-ROM fails with this error: "mount: /dev/scd7 is not a
valid block device"
Your
CD-ROM or CD-RW requires scsi emulation. When the installation greets
you with the first prompt (where it says "boot:" at the bottom
left) you should type :
ide hdx=ide-scsi
(where
x is your cd-rom unit).
If
that doesn't work restart and try writing
scsi hdx=ide-scsi
(where
x is your cd-rom unit).
Note:
The Linux Kernel 2.6.x treats CD-Rx drives in a different way than previous
kernels, so this problem shouldn´t arise, it is still mentioned
here for the record.
Top
10.
Credits
Copyright
2004 Vector Linux
Released under [GNU Free Document License [ http://www.gnu.org/licenses/fdl.html
]
Contributed By: Joe1962, Johnvan, Kocil, Monty67, Mutiny, Shallow
Hal, SuSe-Refugee, UKBill.
|